Pages

Friday, April 17, 2015

New CT Tutorial For Fedor Using Tube **Elizabeth**


Elizabeth

This tutorial was written by SpiceAng on April 17th, 2015. Any resemblance to any other tutorials is purely coincidental! You may not copy/paste any part of my tuts elsewhere, but you may text link to them for challenges etc!
*********
Supplies Needed:

Tube of Choice, I am using a PTU Tube called *Elizabeth* By ©Fedor

You can find  this gorgeous tube by ©Fedor here.
http://picsfordesign.com/en/catalogue/id_117778_elizabeth.pix

Scrap Kit of choice, I am using a FTU  Scrapkit called *Fan Freebie 2* By Tasha's Playground
You can find this amazing kit in her blog here.


Mask of choice

Program Used: Paint Shop Pro X7 but any PSP should work.
****************
Let's Begin

650X650 New Image Canvas-Transparent BKgrnd

Open your tube of choice
Copy & Paste to your canvas. Resize & Position to the center. Flip by pressing ctrl+M.

Open TP_FF2_e21
Copy & Paste to bottom layer. Resize & Position to the right side middle.

Open TP_FF2_e02
Cope & Paste to top layer.  Resize and Position to center bottom of tubes legs. (Duplicate)

Open TP_FF2_e04
Copy & Paste to top layer. Resize & Position to the left bottom corner of last action we just added.

Open TP_FF2_e22
Copy & Paste to layer just below top layer (Flowers). Resize & Position add to blend in down to the bottom of your work. Flip By pressing ctrl+M. ( Duplicate)

Open TP_FF2_e11
Copy & Paste to bottom layer. Resize & Position add to center in the middle of your canvas.

Open TP_FF2_e14
Copy & Paste to layer just above e11.  Resize & Position add to the left side and blend in with bottom layer. Rotate if you wish as I have done. (Duplicate) then mirror image copy by pressing ctrl+B. You may want to rotate your copy.

Open TP_FF2_e01
Copy & Paste to layer just below e04. Resize & Position to left bottom behind purple flowers.

Open TP_FF2_e12
Copy & Paste to top layer. Resize & Position to the right side and add to e21. (Duplicate) add where you wish and as many as you want.

Open TP_FF2_e19
Copy & Paste to top layer. Resize & Position to right side and add where you wish.

Open TP_FF2_e06
Copy & Paste to top layer. Resize & Position to right side and add in front of of stool. Flip by pressing ctrl+M.

Open TP_FF2_e17
Copy & Paste to layer just below e04. Resize & Position to left side and blend in with your other flower layers. Flip by pressing ctrl+M if you wish to do so.

Open  TP_FF2_paper01
Copy & Paste on bottom layer
Resize to fit canvas

Then add mask of choice
Mask I used is called RR_MaskSet_2_1

Font used Playball  Size 20 (Bold)
*******************************
Drop shadow used in all layers was
Vertical: 2  Horizontal: 2  Opacity: 45  Blur: 14.00
To finish add any other details and your copyright.
Make sure to save your work then you are finished.
*******************************
Hope this was easy and fun to follow!
Thanks for trying my tutorial.

Thursday, April 16, 2015

New CT Tutorial For PinkParadox Productions Using Kit **Undercover Ninja**


Undercover Ninja

This tutorial was written by me on April 16th, 2015. Any resemblance to any other tutorials is purely coincidental! You may not copy/paste any part of my tuts elsewhere, but you may text link to them for challenges etc!
*********
Supplies Needed:

**New CT Tag** Scrap Kit of choice, I am using a PTU Scrapkit called *Undercover Ninja* By Pink Paradox Productions. 
You can find this kit and many other beautiful kits here.


Tube or Image of choice, I am using a PTU Tube Called  *Fan* By ©verymany
you can find this gorgeous tube here.


Mask of choice
I used the mask called WSL_Mask302

Text of choice
My text is called CF Jack Story Font Size 14 Bold

Program Used: Paint Shop Pro X7
****************
Let's Begin

650X650 New Image Canvas-Transparent BKgrnd

Open your tube
Copy & Paste to canvas. Resize and Position add to center of your work.

Open Undercover Ninja (84)
Copy & Paste to bottom layer. Resize & Position add to the center of your canvas.

Open Undercover Ninja (76)
Copy& Paste to layer just below tube. Resize & Position add to the right side up next to (84). Flip by pressing ctrl+M.

Open Undercover Ninja (83)
Copy & Paste to layer just above bottom. Resize & Position to the center lower part behind your tube.

Open Undercover Ninja (72)
Copy & Paste to layer just above (83). Resize & Position add to top of bench layer as if it was sitting on the bench. Place it off to the right side on bench.

Open Undercover Ninja (73)
Copy & Paste to layer just above (83). Resize & Position to the left side and place on top of bench as if it is sitting on it.

Open Undercover Ninja (94)
Copy & Paste to layer just above (84). Resize & Position add to center and fit to your bottom layer.

Open Undercover Ninja (97)
Copy & Paste to layer just above (94). Resize & Position add to right side. Blend in behind your bench flip by pressing ctrl+M.

Open Undercover Ninja (88)
Copy & Paste to layer just above (94). Resize & Position add to right side middle. (Duplicate) with copy we are going to mirror image it by pressing ctrl+B.

Open Undercover Ninja (47)
Copy & Paste to layer just above your tube. Resize & Position add to center bottom down by your tubes legs.

Open Undercover Ninja (45)
Copy & Paste to layer just above (47). Resize & Position add to the top of plate off to the left side.

Open Undercover Ninja (49)
Copy & Paste to layer just below (45). Resize & Position add to top of plate off to right side.

Open Undercover Ninja (50)
Copy & Paste to top layer. Resize & Position add to plate in front of bowl of rice.

Open Undercover Ninja (46)
Copy & Paste to top layer. Resize & Position add to the center of plate. Flip by pressing ctrl+M and rotate if you wish as I have done.

Open Undercover (148)
Copy & Paste to layer just above (94). Resize & Position add to top center of your work as I have done.

Open Undercover Ninja (1)
Copy & Paste to layer just below tube. Resize & Position to the left side next to bench. Flip by pressing ctrl+M.

Open Undercover Ninja (153)
Copy & Paste to layer just below (148). Resize & Position to the left side behind bench and tiger. (Duplicate) then we are going to mirror image by pressing ctrl+B.

Open Bumble Bee Royalty (108)
Copy & Paste to layer just below (76). Resize & Position to the center bottom of your work. (Duplicate) then flip your copy by pressing ctrl+M.

Open Undercover Ninja Papers (52)
Copy & Paste to bottom
Resize & Position to fit your canvas.

Add mask of your choice.

*******************************
Drop shadow used in all layers was
Vertical: 2  Horizontal: 2  Opacity: 45  Blur: 13.00
To finish add any other details and your copyright.
Make sure to save your work then you are finished.
*******************************
Hope this was easy and fun to follow!
Thanks for trying my tutorial.


Wednesday, April 15, 2015

New CT Tutorial for Spazzd Art/MellieBeans Tube used *Grad Pup* By Spazz Kit used *Graduation 2015* By MellieBeans


Graduation 2015

This tutorial was written by me  on April 15th, 2015. Any resemblance to any other tutorials is purely coincidental! You may not copy/paste any part of my tuts elsewhere, but you may text link to them for challenges etc!
*********
Supplies Needed:

Scrap Kit of choice, I am using a PTU  Scrapkit called *Graduation 2015* By Mellie Beans

You can purchase her kits from these stores just click on the links.

http://www.mysticalscraps.com/index.php?main_page=product_info&cPath=7_221&products_id=12122

http://www.heartbeatzcreationz.com/index.php?main_page=product_info&cPath=1_244&products_id=14701

http://spazzdart.com/store/index.php?main_page=product_info&cPath=5_58&products_id=1103


Tube or Image of choice, I am using a PTU Tube *Grad Pup* By ©Spazzd Art can be found here.


Mask of choice

Program Used: Paint Shop Pro X7 but any PSP should work.
****************
Let's Begin

650X650New Image Canvas-Transparent BKgrnd

Open your tube
Copy & Paste to center of your canvas.

Open Books
Copy &Paste to bottom layer. Resize & Position a little to the left from the center of your work behind your tube.

Open Diploma
Copy & Paste to layer just below tube.  Resize & Position add to left bottom corner of books. Rotate the diploma if you like as I have done.

Open Grad Cake
Copy & Paste to layer just below tube. Resize & Position add to right side up against books.

Open Laptop
Copy & Paste to layer just below diploma. Resize & Position add to center and place as if tube is sitting on the laptop.

Open Music
Copy & Paste to layer just below tube. Resize & Position add to center to upper top of books.

Open Camera
Copy & Paste to top layer. Resize & Position to left side lower part on books and corner of diploma.

Open Cap and Gown 1
Copy & Paste to layer just above books. Resize & Position add to the top of your books. Select the Eraser Tool and Erase the cap from the layer. Blend the gown in with the books as I have done.

Open Star Tag
Copy & Paste to top layer. Resize & Position add right side upper corner of books. Rotate if you wish as I have done.

Open Bow 3
Copy & Paste to top layer. Resize & Position add to top of your star tag.

Open Stars
Copy & Paste to layer just below music. Resize & Position add to lower right side (duplicate) mirror image by pressing ctrl+B.

Open Balloon 2
Copy & Paste to layer just blow tube. Resize & Position add to the center top of tubes head.

Open Balloon 4
Copy & Paste to layer just below balloon 2. Resize & Position add to right side of other balloon.


Open cap paper 1
Copy & Paste to bottom layer
Resize to fit your whole canvas. (Duplicate)

Then add mask of choice
Mask I used is called WSL_Mask302

Font used AHDN Size 22 Bold
*******************************
Drop shadow used in all layers was
Vertical: 2  Horizontal: 2  Opacity: 45  Blur: 14.00

To finish add any other details and your copyright.
Make sure to save your work then you are finished.
*******************************
Hope this was easy and fun to follow!
Thanks for trying my tutorial.


New CT Tutorial For Fedor Using Tube **Valentina**


Valentina

This tutorial was written by SpiceAng on April 15th, 2015. Any resemblance to any other tutorials is purely coincidental! You may not copy/paste any part of my tuts elsewhere, but you may text link to them for challenges etc!
*********
Supplies Needed:

Tube of Choice, I am using a PTU Tube called *Valentina* By ©Fedor

You can find  this gorgeous tube by ©Fedor here.


Scrap Kit of choice, I am using a FTU  Scrapkit called *Porcelain Doll* By Gimptastic Scraps
You can find this amazing kit in her blog here.


Mask of choice

Program Used: Paint Shop Pro X7 but any PSP should work.
****************
Let's Begin

650X650 New Image Canvas-Transparent BKgrnd

Open your tube of choice
Copy & Paste to your canvas. Resize & Position to the center.

Open Frame2
Copy & Paste to bottom layer. Resize & Position to the center bottom of your tube.

Open Beads
Cope & Paste to top layer.. Resize and Position to center bottom of tube.

Open Hearts
Copy & Paste to top layer. Resize & Position to the left bottom corner.

Open LightScatter
Copy & Paste to layer just above frame2. Resize & Position to the left bottom behind tube. (Duplicate) select copy and then mirror image by pressing ctrl+B.

Open Ruffle
Copy & Paste to layer just above tube. Resize & Position add to center bottom. Flip by pressing ctrl+M.

Open Shoe
Copy & Paste to top layer.  Resize & Position add to the right bottom corner will need to rotate some.

Open You+Me
Copy & Paste to layer just below beads. Resize & Position to right bottom. Fit in behind your other elements.

Open SweetTag
Copy & Paste to top layer. Resize & Position to the center bottom center it with tube.

Open Sparkles2
Copy & Paste to layer just below tube. Resize & Position to upper part of your work. Then duplicate as many times as you like. Just place them and resize where you wish.

Open  Paper 8
Copy & Paste on bottom layer
Resize to fit canvas

Then add mask of choice
Mask I used is called MSL_Mask302

Font used AHDN  Size 16 (Bold)
*******************************
Drop shadow used in all layers was
Vertical: 2  Horizontal: 2  Opacity: 45  Blur: 14.00
To finish add any other details and your copyright.
Make sure to save your work then you are finished.
*******************************
Hope this was easy and fun to follow!
Thanks for trying my tutorial.

She comes with other color layers and options.

Tuesday, April 14, 2015

New CT Tutorial For Ginnibug Designz Using Kit **Summer**

Summer

This tutorial was written by me  on April 14th, 2015. Any resemblance to any other tutorials is purely coincidental! You may not copy/paste any part of my tuts elsewhere, but you may text link to them for challenges etc!
*********
Supplies Needed:

Scrap Kit of choice, I am using a PTU  Scrapkit called *Summer* By Ginnibug Designz

You can purchase her kit from here.

Hania's Designs: http://haniadesign.com/store/index.php?main_page=product_info&cPath=50_164&products_id=2541&zenid=365eecf025ad46531af3d0f2b4e8d8ce

Tube or Image of choice, I am using a FTU Tube *2013-2014 Tats HDSL (FREE)* By ©Ismail Rac can be found here.


Mask of choice

Program Used: Paint Shop Pro X7 but any PSP should work.
****************
Let's Begin

650X650 New Image Canvas-Transparent BKgrnd

Open your tube of choice
Copy & Paste  Resize & Position to left side of your work.

Open s25
Copy &Paste to bottom layer. Resize & Position add to center of your canvas.

Open s11
Copy & Paste to layer just above s25. Resize & Position add to right bottom corner.

Open s16
Copy & Paste to layer just above s25. Resize & Position add to right bottom behind s11. Flip by pressing ctrl+M.

Open s17
Copy & Paste to layer just above s25. Resize & Position add to right bottom behind s11 and s16. Blend in.

Open s35
Copy & Paste to layer just above s25. Resize & Position add to right upper corner.

Open s42
Copy & Paste to layer just above s25. Resize & Position add to center bottom of s25.

Open s74
Copy & Paste to layer just above s25. Resize & Position add to center bottom of s25.

Open s22
Copy & Paste to layer just above s25. Resize & Position add to right side behind s74. Blend into the background.

Open s19
Copy & Paste to top layer. Resize & Position add to right side. Flip by pressing ctrl+M then place to look as if sitting on the handle of basket.

Open s6
Copy & Paste to layer just below tube. Resize & Position add to either side of tube bottom. (Duplicate) then flip by pressing ctrl+M and add copy to the opposite side of the tube.

Open s7
Copy & Paste to top layer. Resize & Position add to left bottom blend in with the tube and beach sign.

Open sp7
Copy& Paste to bottom layer. Resize & Position to fit inside your s25.

Open sp10
Copy & Paste on bottom layer
Resize to fit frame layer. (Duplicate)

Then add mask of choice
Mask I used is called WSL_Mask302

Font used Berlin Sans FB Size 20 and 15 Bold 
*******************************
Drop shadow used in all layers was
Vertical: 2  Horizontal: 2  Opacity: 45  Blur: 14.00

To finish add any other details and your copyright.
Make sure to save your work then you are finished.
*******************************
Hope this was easy and fun to follow!
Thanks for trying my tutorial.


Monday, April 13, 2015

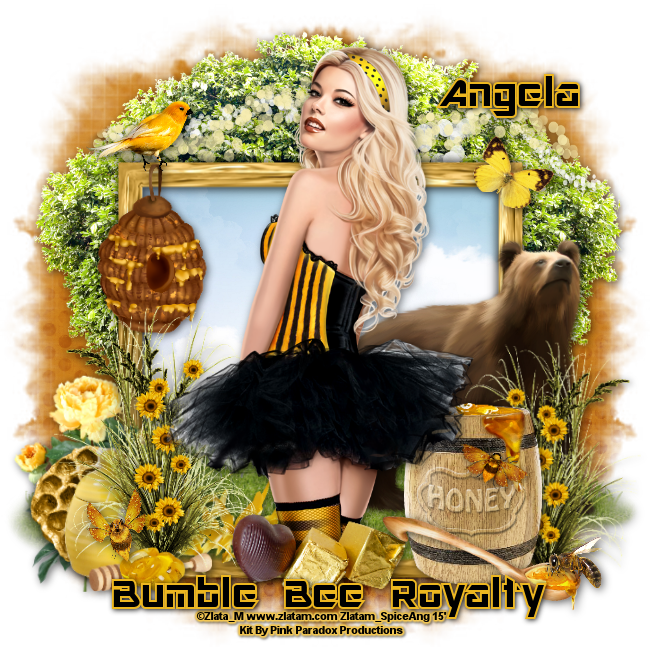
New CT Tutorial For PinkParadox Productions Using Kit **Bumble Bee Royalty**


Bumble Bee Royalty

This tutorial was written by me on April 13th, 2015. Any resemblance to any other tutorials is purely coincidental! You may not copy/paste any part of my tuts elsewhere, but you may text link to them for challenges etc!
*********
Supplies Needed:

**New CT Tag** Scrap Kit of choice, I am using a PTU Scrapkit called *Bumble Bee Royalty* By Pink Paradox Productions.

You can find this kit and many other beautiful kits here.

Tube or Image of choice, I am using a PTU Tube Called  *Just Bee* By ©Zlata_M
you can find this gorgeous tube here.

Mask of choice
I used the mask called WSL_Mask302

Text of choice
My text is called AR DESTINE Font Size 16 Bold

Program Used: Paint Shop Pro X7
****************
Let's Begin

650X650 New Image Canvas-Transparent BKgrnd

Open your tube
Copy & Paste to canvas. Resize and Position add to center of your work.

Open Bumble Bee Royalty Frames (4)
Copy & Paste to bottom layer. Resize & Position add to the center of your tube.

Open Bumble Bee Royalty (36)
Copy& Paste to layer just below tube. Resize & Position add to the left bottom corner.

Open Bumble Bee Royalty (33)
Copy & Paste to top layer. Resize & Position to the center of tube.

Open Bumble Bee Royalty (37)
Copy & Paste to top layer. Resize & Position add to the left bottom corner. Flip by pressing ctrl+M.

Open Bumble Bee Royalty (2)
Copy & Paste to layer just above frame. Resize & Position to left bottom. Flip by pressing ctrl+M.

Open Bumble Bee Royalty (13)
Copy & Paste to top layer. Resize & Position add to left bottom place so the bee look as if it is on the spoon of honey.

Open Bumble Bee Royalty (15)
Copy & Paste to top layer. Resize & Position add to the left bottom place on the honey barrel.

Open Bumble Bee Royalty (35)
Copy & Paste to layer just above frame. Resize & Position add to right top corner of frame.

Open Bumble Bee Royalty (38)
Copy & Paste to layer just below your tube. Resize & Position add to right bottom corner.

Open Bumble Bee Royalty (39)
Copy & Paste to layer just above frame. Resize & Position add to the right bottom behind (38).

Open Bumble Bee Royalty (55)
Copy & Paste to layer just above frame. Resize & Position add to right bottom behind (39). Blend in as you like.

Open Bumble Bee Royalty (80)
Copy & Paste to layer just above frame. Resize & Position add to the center bottom center. Use your eraser tool to erase the grass below frame.

Open Bumble Bee Royalty (125)
Copy & Paste to layer just above grass. Resize & Position add to the right bottom. Flip by pressing ctrl+M.

Open Bumble Bee Royalty (123)
Copy & Paste to layer above your grass. Resize & Position add to the right bottom blend it in between your tube and the other elements.

Open Bumble Bee Royalty (150)
Copy & Paste to bottom layer. Resize & Position to the cneter top.

Open Bumble Bee Royalty (7)
Copy & Paste to top layer. Resize & Position to the left top corner of frame.

Open Bumble Bee Royalty (16)
Copy & Paste to top layer. Resize & Position to the right bottom corner.

Open Bumble Bee Royalty (6)
Copy & Paste to top layer. Resize & Position to the right top corner.

Open Bumble Bee Royalty (135)
Copy & Paste to layer just above bear. Resize & Position to right bottom. ( Duplicate) with copy mirror image by pressing ctrl+B.

Open Bumble Bee Royalty (169)
Copy & Paste to layer just above tree. Resize & Position to center just above frame.

Open Bumble Bee Royalty Papers (43)
Copy & Paste to layer just below your first frame.
Resize & Position to fit in the frame.

Open Bumble Bee Royalty (20)
Copy & Paste to bottom
Resize & Position to fit your canvas.

Add mask of your choice.

*******************************
Drop shadow used in all layers was
Vertical: 2  Horizontal: 2  Opacity: 45  Blur: 13.00
To finish add any other details and your copyright.
Make sure to save your work then you are finished.
*******************************
Hope this was easy and fun to follow!
Thanks for trying my tutorial.


Friday, April 10, 2015

New CT Tutorial For Fedor Using Tube **Springtime**


Springtime

This tutorial was written by SpiceAng on April 10th, 2015. Any resemblance to any other tutorials is purely coincidental! You may not copy/paste any part of my tuts elsewhere, but you may text link to them for challenges etc!
*********
Supplies Needed:

Tube of Choice, I am using a PTU Tube called *Springtime* By ©Fedor

You can find  this gorgeous tube by ©Fedor here.

 
Scrap Kit of choice, I am using a PTU  Scrapkit called *Summer Evening* By Tiny Turtle Design

You can purchase her amazing kits in her store here.

 
Mask of choice

Program Used: Paint Shop Pro X7 but any PSP should work.
****************
Let's Begin

650X650 New Image Canvas-Transparent BKgrnd

Open your tube of choice
Copy & Paste to your canvas. Resize & Position to the center.

Open Summer Evening Frame (38)
Copy & Paste to bottom layer. Resize & Position to the center bottom of your tube.

Open Summer Evening (36)
Cope & Paste to layer just above frame.. Resize and Position to the left side bottom corner of frame and rotate as I have done.

Open Summer Evening (32)
Copy & Paste to layer just above frame. Resize & Position to the left side just behind your last element (36).

Open Summer Evening (24)
Copy & Paste to layer just below tube. Resize & Position to the left side down in the corner of your frame and blend in with your other elements.

Open Summer Evening (7)
Copy & Paste to layer just above frame. Resize & Position add to the left side upper part of your frame. (Duplicate) then we need to mirror image the copy by pressing ctrl+B.

Open Summer Evening (39)
Copy & Paste to layer just below tube.  Resize & Position add to the right side down in the corner of the frame. Then you can flip as I have done by pressing ctrl+M.

Open Summer Evening (43)
Copy & Paste to layer just below element (39). Resize & Position to right side just behind your cup element and put off to either side. (Duplicate) then flip by pressing ctrl+M and move if you wish to your liking.

Open Summer Evening (47)
Copy & Paste to layer just below element (43). Resize & Position to the right side behind your other element and adjust to your liking.

Open Summer Evening (64)
Copy & Paste to layer just above frame. Resize & Position to left side top corner of your frame. (Duplicate) then we are going to add the copy to the other side by pressing ctrl+B.

Open Summer Evening (107)
Copy & Paste to top layer. Resize & Position to center of your tube. Then select your eraser tool and then erase the bottom part of your tube as I have done.

Open Summer Evening Paper (19)
Copy & Paste to bottom layer. Resize & Position to fit inside your frame layer.

Open  Summer Evening Paper (16)
Copy & Paste on bottom layer
Resize to fit canvas

Then add mask of choice
Mask I used is called MSL_Mask302

Font used Allura Size 20 and for Spring Time I used Size 18 (Bold)
*******************************
Drop shadow used in all layers was
Vertical: 2  Horizontal: 2  Opacity: 45  Blur: 14.00
To finish add any other details and your copyright.
Make sure to save your work then you are finished.
*******************************
Hope this was easy and fun to follow!
Thanks for trying my tutorial.