Pages

Friday, March 18, 2016

New CT Tutorial For PinkParadox Productions Using Kit **Heart, Mind & Soul**

✿➹⁀✿ Heart, Mind & Soul ✿➹⁀✿

This tutorial was written by me on March 18th, 2016. Any resemblance to any other tutorials is purely coincidental! You may not copy/paste any part of my tuts elsewhere, but you may text link to them for challenges etc!
*********
Supplies Needed:

**New CT Tag** Scrap Kit of choice, I am using a PTU Scrapkit called ♥Heart, Mind & Soul ♥ By Pink Paradox Productions.

You can find this kit and many other beautiful kits here.

Tube or Image of choice, I am using a PTU Tube Called  *Regina (Exclusive)* By ©Alehandra_Vanhek
You can find this gorgeous tube here.

Mask of choice
I used the mask called  WSL_Mask302

Text of choice
My text is called CoventryGarden Size 18 Bold

Program Used: Paint Shop Pro X7
****************
Let's Begin

650X650 New Image Canvas-Transparent BKgrnd

Open Element (127)
Copy & Paste to bottom layer. Re size & Position add to center toward the bottom.

Open Element (122)
Copy& Paste to top layer. Re size & Position add to center of your canvas as I have done.

Open Element (126)
Copy& Paste to top layer. Re size & Position add to right side right next to  element (122). Duplicate and mirror image to match on other side.

Open Element (13)
Copy& Paste to layer just above element (122). Re size & Position to left side up next to element (122). Place as you wish.

Open Element (102)
Copy& Paste to top layer. Re size & Position add to right side up top in corner on element (122). Duplicate and mirrow image to match on other side.

Open Your Tube
Copy & Paste to top layer. Re size & Position add to bottom center.

Open Element (4)
Copy & Paste to layer just below tube. Re size & Position add to the left side right behind tube.

Open Element (8)
Copy& Paste to top layer. Re size & Position add to tube or in front of your tube.

Open Element (42)
Copy & Paste to top layer. Re size & Position add in from of your tube and add as you wish.

Open Element (32)
Copy & Paste to layer just above element (122). Re size & Position add to right side up next to element (122). Place where you would like it.

Open Element (151)
Copy & Paste to layer just above element (122). Re size & Position add to right side up next to element (122) as I have. Then flip if you wish. Duplicate and mirror image to match on other side.

Open Element (168)
Copy& Paste to bottom layer. Re size & Position add to top then once you have as you like then use your eraser tool to erase the inside of element (122). Duplicate and mirror image to match on the other side.

Open Element (77)
Copy & Paste to top layer. Re size & Position add to left side of your tube.

Open Element (85)
Copy & Paste to layer just below tube. Re size & Position add to left side and add as if under the candle element.

Open Element (89)
Copy & Paste to layer just above tube. Re size & Position add to left side up next to tubes leg.

Open Element (134)
Copy & Paste to layer just below your first layer of your mask. Re size & Position add so that it is up in the black area where your wording is.

Open Papers (17)
Copy & Paste to bottom
Resize & Position to fit your canvas.

Add mask of your choice.
*******************************
Drop shadow used in all layers was
Vertical: 2  Horizontal: 2  Opacity: 55  Blur: 13.00
To finish add any other details and your copyright.
Make sure to save your work then you are finished.
*******************************
Hope this was easy and fun to follow!
Thanks for trying my tutorial.


Wednesday, March 16, 2016

New CT Tutorial For PinkParadox Productions Using Kit **Spring Embrace**

✿➹⁀✿ Spring Embrace ✿➹⁀✿

This tutorial was written by me on March 16th, 2016. Any resemblance to any other tutorials is purely coincidental! You may not copy/paste any part of my tuts elsewhere, but you may text link to them for challenges etc!
*********
Supplies Needed:

**New CT Tag** Scrap Kit of choice, I am using a PTU Scrapkit called ♥Spring Embrace♥ By Pink Paradox Productions.

You can find this kit and many other beautiful kits here.
http://pinkparadoxproductions.com/store/index.php?main_page=product_info&cPath=1_2&products_id=754

Tube or Image of choice, I am using a PTU Tube Called  *Bunny 2* By ©Verymany
You can find this gorgeous tube here.
http://verymanytubes.com/

Mask of choice
I used the mask called  WSL_Mask302

Text of choice
My text is called CF Old Milwaukee Size 20 Bold

Program Used: Paint Shop Pro X7
****************
Let's Begin

650X650 New Image Canvas-Transparent BKgrnd

Open Frame (14)
Copy & Paste to bottom layer. Re size & Position add to upper part center on canvas.

Open Element (15)
Copy& Paste to top layer. Re size & Position add to left side of frame and place as you like.

Open Element (7)
Copy& Paste to top layer. Re size & Position add to right side right next to  element (15).

Open Element (2)
Copy& Paste to top layer. Re size & Position to left side up next to element (15). Place as you wish.

Open Element (23)
Copy& Paste to top layer. Re size & Position add to right side up top on your frame. I have flip the element if you wish to do the same.

Open Element (43)
Copy& Paste to layer just above frame. Re size & Position add to left side up behind your other elements and blend it in as you wish.

Open Element (98)
Copy& Paste to bottom layer. Re size & Position add to the center bottom. Duplicate and flip if you wish to fill in more of your work with the grass.

Open Element (90)
Copy& Paste to layer just above element (98). Re size & Position add to either side to the top of your element (98). Then duplicate and mirror image by pressing ctrl+B.

Open Element (126)
Copy& Paste to layer just below frame. Re size & Position add to front of element (90). Duplicate and mirror image. Add as you wish.

Open Element (16)
Copy& Paste to layer just above frame. Re size & Position add to right side up next to element (98). Place where you would like it.

Open Element (3)
Copy& Paste to top layer. Re size & Position add to bottom of your work and add where you wish.

Open Element (4)
Copy& Paste to top layer. Re size & Position add to bottom toward the center of you work.

Open Element (38)
Copy& Paste to layer just above frame. Re size & Position add to blend in behind your little chicks.

Open Element (80)
Copy& Paste to layer just above frame. Re size & Position add to top of wall element.

Open Element (75)
Copy& Paste to layer just above frame. Re size & Position add to left side and blend it in as you wish.

Open Element (144)
Copy& Paste to top layer. Re size & Position add to left upper side on your frame.

Open Element (156)
Copy& Paste to layer just below frame. Re size & Position add to right side up behind angel by the wall. Duplicate if you wish to make it darker and stick out as I have done.

Open Element (10)
Copy& Paste to top layer. Re size & Position add to right side up by the angel by the wall. Duplicate and make second copy smaller and add as you like.

Open your tube
Copy & Paste to layer just above frame. Re size and Position duplicate and then with your copy move it behind frame. Then use your eraser tool and erase parts of your tube to make it as if she is in the frame.

Open Papers (26)
Copy & Paste to bottom
Re size & Position to fit your canvas.

Add mask of your choice.
*******************************
Drop shadow used in all layers was
Vertical: 2  Horizontal: 2  Opacity: 55  Blur: 13.00
To finish add any other details and your copyright.
Make sure to save your work then you are finished.
*******************************
Hope this was easy and fun to follow!
Thanks for trying my tutorial.


Tuesday, March 15, 2016

New CT Tutorial For PinkParadox Productions Using Kit **Beautifully Exotic**

✿➹⁀✿ Beautifully Exotic✿➹⁀✿

This tutorial was written by me on March 15th, 2016. Any resemblance to any other tutorials is purely coincidental! You may not copy/paste any part of my tuts elsewhere, but you may text link to them for challenges etc!
*********
Supplies Needed:

**New CT Tag** Scrap Kit of choice, I am using a PTU Scrapkit called ♥Beautifully Exotic♥ By Pink Paradox Productions.

You can find this kit and many other beautiful kits here.
http://pinkparadoxproductions.com/store/index.php?main_page=product_info&cPath=1_2&products_id=753

Tube or Image of choice, I am using a PTU Tube Called  *Ride* By ©Nocturne
You can find this gorgeous tube here.
http://picsfordesign.com/en/catalogue/a135563.pix

Mask of choice
I used the mask called  WSL_Mask302

Text of choice
My text is called Juergen Size 14 Bold

Program Used: Paint Shop Pro X7
****************
Let's Begin

650X650 New Image Canvas-Transparent BKgrnd

 
Open Element (101)
Copy & Paste to bottom layer. Re size & Position add to upper part center on canvas.

Open Element (102)
Copy& Paste to top layer. Re size & Position add center of element (101) as I have done.

Open Element (103)
Copy& Paste to bottom layer. Re size & Position add to center and adjust to your liking. Then duplicate and flip or arrange as you wish.

Open Element (104)
Copy& Paste to top layer. Re size & Position to center toward the bottom as I have done. Then adjust and duplicate as you wish.

Open Element (98)
Copy& Paste to top layer. Re size & Position add to right side and place as you wish.

Open Element (99)
Copy& Paste to top layer. Re size & Position add to right side place on top of element (98). Then if you would like it darker as I have done duplicate it.

Open Element (139)
Copy& Paste to top layer. Re size & Position add to the front of element (98). Duplicate and flip as you wish.

Open Element (141)
Copy& Paste to bottom layer. Re size & Position add to either side of the top layers then duplicate and add to the other side as I have done.

Open Element (132)
Copy& Paste to top layer. Re size & Position add to front of fountain. Add as you wish.

Open Element (24)
Copy& Paste to top layer. Re size & Position add to front of fountain. Add as you wish.

Open Element (25)
Copy& Paste to top layer. Re size & Position add to front of fountain up next to element (24).

Open Element (33)
Copy& Paste to layer just below element (24). Re size & Position add to front of fountain. Add as you wish.

Open Element (4)
Copy& Paste to layer below element (33). Re size & Position add to blend in with the fruit or as you wish.

Open Element (10)
Copy& Paste to top layer. Re size & Position add to top of palm tree.

Open Element (10)
Copy& Paste to layer just below fountain. Re size & Position add as you wish.

Open Element (2)
Copy& Paste to top layer. Re size & Position add as you wish.

Open Element (3)
Copy& Paste to top layer. Re size & Position add as you wish.

Open Element (145)
Copy& Paste to top layer. Re size & Position add to top of your work and place where you wish.

Open your tube
Copy & Paste to top layer. Re size and Position add to left side bottom on canvas.

Open Papers (11)
Copy & Paste to bottom
Re size & Position to fit your canvas.

Add mask of your choice.
*******************************
Drop shadow used in all layers was
Vertical: 2  Horizontal: 2  Opacity: 65  Blur: 13.00
To finish add any other details and your copyright.
Make sure to save your work then you are finished.
*******************************
Hope this was easy and fun to follow!
Thanks for trying my tutorial.


Wednesday, March 9, 2016

CT Tags For Pink Paradox Productions - Using Kit "Flowering Melody"


✿➹⁀✿ CT for Pink Paradox Productions ✿➹⁀✿
The Gorgeous Scrap kit used is called ♥Flowering Melody♥

With this kit you can do Spring/Outdoors themes...A fantastic selection of elements, to use year round =) . Designed to match the gorgeous "Jennifer" . Fun to work with!Endless fun..
This kit comes with  155 Elements, 10 Frames, and 40 Papers
You can pick it up here
http://pinkparadoxproductions.com/store/index.php?main_page=product_info&cPath=1_2&products_id=751

In both creation ,  I used the art by ©verymany Tube name: Jennifer
Tube can be purchased here:
http://verymanytubes.com/


Tuesday, March 8, 2016

CT Tags For Pink Paradox Productions - Using Kit "Weathering The Storm"


✿➹⁀✿ CT for Pink Paradox Productions ✿➹⁀✿
The Gorgeous Scrap kit used is called ♥Weathering The Storm♥

With this kit you can do Dark/Bad Day themes...A fantastic selection of elements, to use year round =) . Fun to work with!Endless fun..
This kit comes with  155 Elements, 15 Frames, and 40 Papers
You can pick it up here
http://pinkparadoxproductions.com/store/index.php?main_page=product_info&cPath=1_2&products_id=748

In first creation ,  I used the art by ©Alex_Prihodko Tube name: Dark Queen
Tube can be purchased here:
http://picsfordesign.com

In second creation, I used the art by ©Zindy S.D. Nielson Tube name:Dreary Winter
Tube is no longer for purchase.


Saturday, March 5, 2016

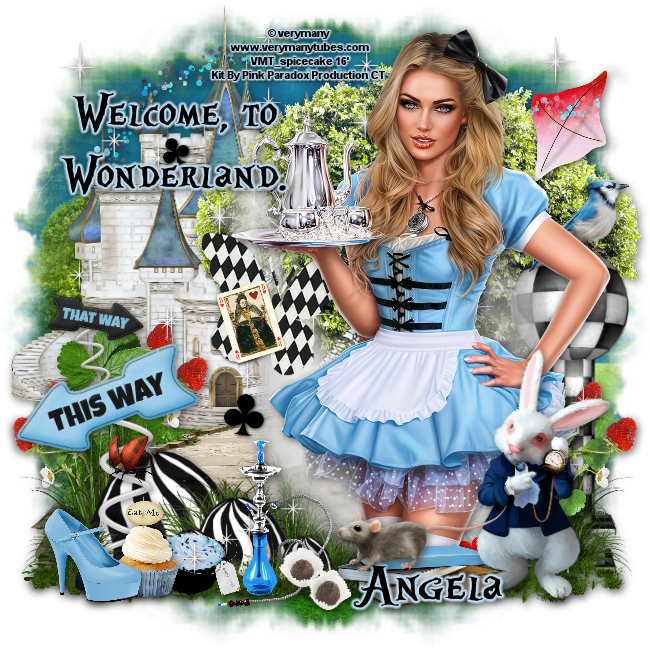
CT Tags For Pink Paradox Productions - Using Kit "Alice In Wonderland"


✿➹⁀✿ CT for Pink Paradox Productions ✿➹⁀✿
The Gorgeous Scrap kit used is called ♥Alice In Wonderland♥

With this kit you can do Wonderland/Spring themes...A fantastic selection of elements, to use year round =) .Designed to match Verymany's awesome "Alice 2". Fun to work with!Endless fun..
This kit comes with  185 Elements, 15 Frames, and 45 Papers
You can pick it up here
http://pinkparadoxproductions.com/store/index.php?main_page=product_info&cPath=1_2&products_id=746

In both creation ,  I used the art by ©verymany Tube name: Alice_2
Tube can be purchased here:
www.verymanytubes.com


Thursday, March 3, 2016

CT Tags For Pink Paradox Productions - Using Kit "Sultry Rendezvous"


✿➹⁀✿ CT for Pink Paradox Productions ✿➹⁀✿
The Gorgeous Scrap kit used is called ♥Sultry Rendezvous♥

With this kit you can do Coffee/Outdoors themes...A fantastic selection of elements, to use year round =) .Inspired by Verymany's "Rosanna." Fun to work with!Endless fun..
This kit comes with  150 Elements, 15 Frames, and 35 Papers
You can pick it up here
http://pinkparadoxproductions.com/store/index.php?main_page=product_info&cPath=1_2&products_id=745

In both creation ,  I used the art by ©verymany Tube name: Rosanna
Tube can be purchased here:
www.verymanytubes.com